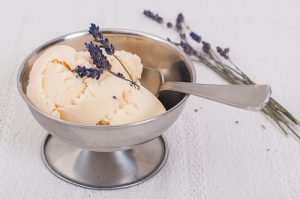
Lavender Ice Cream

You might have figured out by now–although this is only my second post–that flowers play an important part of what I think of when I think of romance. The way they look. They way they smell. And yes, even the way they taste.

It might be odd to find a recipe featuring ice cream in November. But if you think about how heavy many of our menus are during this month, it isn’t that surprising that something that’s light and refreshing might hit the spot. When holiday meals become too much, grab your special someone and share lavender ice cream… right out of the tub.

It’s really rich, so like the best of things, small amounts go a long way. And a shared delight is just that much better.

Lavender Ice Cream

6 egg yolks
2 cups half and half 1 cup cream
2/3 cup vanilla sugar
1 vanilla bean
3 whole lavender tops or 2 tbsp dried lavender- be sure to use organic, food grade

1. Prepare a water bath in a large bowl. Set aside.

2. In a saucepan, heat half & half with the cream and the vanilla bean pod denuded of its interior until it simmers. Take off heat and add in the lavender to steep. Set aside until almost room temperature, about 45-60 minutes. When the time has lapsed, strain the mixture and bring it back up to temperature- just short of simmering again. Take off the heat. *Pro-tip: Frozen foods need more flavor for it to come through the freeze. So taste the cream mixture. It should taste fairly strong. Don’t be alarmed. Once the ice cream is fully frozen, the flavor will have mellowed out. In fact, with any flavoring that you add to ice cream or any frozen dessert, it’s best if the flavor is pretty strong prior to freezing to get the best flavor.*

3. Mix egg yolks until lighter in another bowl. Add in vanilla sugar and the scraped out insides of the vanilla bean. Mix well. Temper the eggs with some of the cream mixture until the eggs are brought up to the same temperature as the cream mixture. *tempering of the eggs is why you brought the cream back up to temperature in the last step* Pour it all into the saucepan. Heat over medium-lowish heat for about 2-3 minutes or until it coats the back of a spoon or it reaches 170 degrees.

4. Pour the mixture back through a fine mesh strainer into the egg/sugar bowl and put it all into the water bath. Bring the custard down to room temperature as quickly as possible. About 30-45 minutes. Put it into the fridge uncovered until it no longer forms condensation. Then cover and let sit in fridge for 4-6 hours or overnight.

5. Put into ice cream maker and follow the instructions for the machine.

This ice cream is particularly delightful with sugar cookies made with rose sugar or orange sugar.

Enjoy!

~D

Rose Sugar

Romance and Roses go hand in hand. To make some fabulous rose sugar, it takes almost zero time and only a little advanced planning.

Glass container, sealable to be airtight

White sugar
Rose petals, organic and pesticide free

I didn’t include any measurements because the volume of sugar will vary depending on the size of the container used. Add some sugar, layer in some petals, add more sugar, and repeat until filled.

Keep the sugar closed for at least two weeks. This gives the oils in the roses time to infuse all the sugar.

This sugar can be used in baking delicate treats, like scones. It can also be used to make simple syrup. And simple syrup can be used in a variety of ways, limited only by your imagination.

Alcohol is the New Lube

Seriously. Don’t we already know this? And I mean lube in the best sense of the word. A drink, a cocktail, a beer… all make things easier to deal with. Maybe not deal with in a better way, but deal with as in not allowing the small stuff slow down your flow.

Bad day at the office? A glass of wine makes it all better. Bad day at the office? A glass of wine makes it all better. Argument with the spouse? A mojito might just hit the spot. A promotion at work? Cocktails, all around.

Now, don’t be thinking I think one should use alcohol as a crutch. You shouldn’t. If you need booze to actually deal with the things in your life, alcohol is using you and not the other way around. But at the cap or topper, occasionally? Shoo, we all do it. Now, don’t be thinking I think one should use alcohol as a crutch. You shouldn’t. If you need booze to actually deal with the things in your life, alcohol is using you and not the other way around. But at the cap or topper, occasionally? Shoo, we all do it.

With Halloween just around the corner. You know you’re gonna need a drink to handle all the rugrats about to bumrush your door, yo. And why not show up with a fabulous drink in your hands? 😉

Black Devil Martini

2 oz black rum
1/2 oz dry vermouth (I like Dolin Dry)
black olive garnish
orange sugar

1. Wet rim of martini glass with either rum or vermouth. Coat with orange sugar.
2. In a shaker, combine rum and vermouth with ice. Shake vigorously. Pour into glass. Garnish with black olives.
3. Be devilish. 😉

If you can keep your equanimity while handing out candy to strangers who feel that on one night of the week they can come to your door and beg, then maybe, just maybe, the night will end with some much needed romance. Because this drink is strong and it’s a twist on a traditional martini. And martinis are my jam, y’all. So… oh lube of life, I know you won’t fail me. Because if I’m just a little buzzed, I’m a happy girl and love is in my future. It’s amazing how a drink can somewhat predict my future. And that of my fabulous man. If you can keep your equanimity while handing out candy to strangers who feel that on one night of the week they can come to your door and beg, then maybe, just maybe, the night will end with some much needed romance. Because this drink is strong and it’s a twist on a traditional martini. And martinis are my jam, y’all. So… oh lube of life, I know you won’t fail me. Because if I’m just a little buzzed, I’m a happy girl and love is in my future. It’s amazing how a drink can somewhat predict my future. And that of my fabulous man.

In any event, mix up a martini. And you might meet your own devil on Halloween. He might even be wearing blue jeans. In any event, mix up a martini. And you might meet your own devil on Halloween. He might even be wearing blue jeans.

Homemade Ice Cream

I know I’m jumping the gun. I know that Spring isn’t even here yet. I know all of this. Still, I am craving ice cream. Cold and creamy served under delicious hot fudge, whip cream and nuts. Warm weather can’t get here soon enough. Until then, I’m cranking up the heat and eating ice cream pretending that it’s Summer already.

I use a recipe that is a cross between Alton Brown’s recipe and a Chowhound recipe. It’s a basic vanilla custard. It is fabulous on its own, or you can be adventurous and add other goodies as it mixes.

Homemade Ice Cream

6 egg yolks
2 cups half and half
1 cup cream
2/3 cup vanilla sugar
2 tsp vanilla extract
1 vanilla bean

1. Prepare a water bath in a large bowl. Set aside.

2. In a saucepan, heat half & half with the cream and the vanilla bean pod denuded of its interior until it simmers. Take off heat and set aside.

3. Mix egg yolks until lighter in another bowl. Add in vanilla sugar and the scraped out insides of the vanilla bean. Mix well. Temper the eggs with some of the cream mixture until the eggs are brought up to the same temperature as the cream mixture. Pour it all into the saucepan. Heat over medium-lowish heat for about 2-3 minutes or until it coats the back of a spoon or it reaches 170 degrees.

4. Pour the mixture back through a fine mesh strainer into the egg/sugar bowl and put it all into the water bath. Bring the custard down to room temperature. About 30-45 minutes. Put it into the fridge uncovered until it no longer forms condensation. Then cover and let sit in fridge for 4-6 hours or overnight.

5. Put into ice cream maker and follows the instructions for the machine.

Enjoy!

Foggy Bottom Split Pea Soup

As Fall turns into Winter, all official like, on the solstice, many people around the world celebrate this turn of the season. I always think of it as one last hurrah before we hunker down for the colder months to come. One last feast of plenty in preparation of leaner times. Well, at least that’s how I think it used to be.

In the US, our Holiday Season begins with Thanksgiving and extends straight through to New Year’s Day. In a country of plenty, we’ve taken plenty to the nth degree straight into a month and a half of plenty. I want to muster some form of disgust at this blatant display of wealth and abundance but I can’t. I really can’t. Because the food is frickin’ delicious. Some part of me is just not able to flame the small amount of guilt at loving the food so much into a conflagration. I’m too distracted by the yummy. I like celebrating with food and friends and family and fellowship with all of the above. I like the convivial communal table that comes with such yummy goodness.

To assuage some of the feelings that not feeling bad makes me feel, I pay homage to principles of conservation. What the hell do I mean, you ask. Well, it really is all about the ham bone. Left-overs, yo. What the hell to do with the ham bone. Cause I know you saved it instead of being wasteful. If you thought ahead, you left lots of meat on the bone. Were going to use it to make split pea soup. So break out the Beano, or just go find a room in which to be alone.

Repurpose the Bone! 😉

Foggy Bottom Split Pea Soup


Ingredients:

1 medium onion, diced
1 clove garlic, minced
2 medium carrots, half-mooned
3 stalks celery, diced
1 Tbsp Herbes de Provence
Ham Bone- leave the meat on as it cooks
8 cups chicken/turkey stock (I make stock from the bones of the Thanksgiving turkey)
1 small bag green or yellow split peas
parsley
salt
pepper
optional: 3 medium diced red or yellow potatoes

Directions:

1. Over medium heat, cook onions until translucent. Add garlic, cook for a minute. *I like garlic in my split pea soup. Some people don’t. Omit if you want.* Add carrots and celery. *If you’re adding potatoes, do it here as well.* Cook for 3-5 minutes. Season with salt and pepper. Add the Herbes de Provence. Cook for 2 minutes more.

2. Place Ham bone in the center of the pot. Sprinkle the peas around the bone. Cover with broth- use more or less depending on how big your pot is. Also, any stock not used can be added in later. Bring to a boil. Reduce to simmer and cover. Cook for 40-45 minutes, or until peas are tender.

3. Remove ham bone and set aside to cool slightly. Mash some of the peas with a big spoon, or blend half of it, or use a hand mixer and pulse a few times. Leave enough peas and veggies intact to not have the whole thing mushed. When bone is cool, remove meat. Either tear or chop ham and put back into the pot. Correct seasoning and liquid level. Serve with fresh parsley on top.

Einkorn: Success and Failure

I’ve been slowly replacing my family’s wheat products with Einkorn wheat-mostly. Some wheat strains are pretty old and haven’t changed too much. One is durum wheat used to make semolina pasta. The ancient grain from which durum is derived is khorasan wheat, trademarked and sold as Kamut. To make really good pasta, durum/semolina/khorasan wheat is a MUST. So I’ve decided to use mostly einkorn, and a little  Kamut wheat. I’ve done this slowly so that the replacement has been fairly painless.

It is tempting to walk down the gluten free aisle and/or the specialty bread aisle and pick breads that use ancient grains, or use grains other that wheat. However, this is a trap. I can’t say definitively that all store-bought stuff have things in it that are not so good for you. I mean, half the time I can’t even pronounce some of the chemicals used. Part of eating better is making the food myself so I can control what is put in the recipes. To that end, I’m buying a bread maker at some point so I can make my own bread loaves. Because the thing I’ve noticed when I eat only einkorn wheat is that I don’t have the continued salty/oily food craving that so often comes when I eat bread of any kind. I can’t wait to see what happens when my house is one hundred percent modern wheat/grain free.

That was my success. My failure is recipe related. Seriously, I am not an awesome baker. Not like I can cook. So it should come as no surprise that my Cioppino came out FAB, but my bread loaf was a bust. Don’t get me wrong, it was edible. Just not great. And bread should be great. That’s part of the draw. I didn’t like how hard the crust became. So I am thinking a bread machine might help with this issue. Especially if I get one that has different crust settings. At least, that’s what I’m telling myself.

Not to disappoint, let me leave you with this success. Summer fruit crostata. Crostatas are rustic fruit tarts. Free form, if you will. And they are delicious. And did I mention that I am not the best baker? Well, crostatas are extremely forgiving. EXTREMELY. 😉 You can use almost any fruit you have. I like berries and peaches, or strawberry and rhubarb, or you can come up with your favorite fruit combo. The picture for today’s recipe is my peach and mixed berry crostata made from einkorn wheat. It was delicious.

Fruit Crostata

2014-09-02 14.29.54Ingredients
1 1/4 cup(s) (plus 1 tablespoon) all-purpose einkorn flour
1/4 cup(s) (plus 2 tablespoons) sugar
1/8 teaspoon(s) salt
1/2 cup(s) (1 stick) unsalted butter, softened
2 large eggs, lightly beaten
1 cup(s) raspberries
1 cup(s) fresh blackberries (<— or a combo of fruits to make 2 cups)
1 tablespoon(s) fresh lemon juice
1 tablespoon(s) turbinado sugar

Directions
1. Make the dough: Combine 1 1/4 cups flour, 1/4 cup sugar, and salt in a large bowl. Form a well in center of the dry ingredients and place the butter and 1 egg in the well. Using your hands, mix the ingredients into a soft, pliable dough. Form it into a 4-inch disk and place it on lightly floured parchment paper. Lightly dust the dough with flour and roll it into a 10-inch circle. Place dough with parchment on a baking sheet, cover the dough with plastic wrap, and chill for 10 minutes. (I like to chill my dough for at least 30 minutes, preferably up to an hour or more- it has to do with the butter getting real cold. So you can follow the recipe or follow my suggestion. I know which one I would do. lol). Preheat oven to 375°F.

2. Make the crostata: In a small bowl, mix remaining flour and sugar and set aside. Remove the dough from the refrigerator and evenly spread the flour and sugar mixture on the dough, leaving a 1-inch-wide border around the edge. Place berries on top of the mixture and sprinkle with lemon juice. Fold the 1-inch border over top of the berries to form a 9-inch crostata.

3. Bake the crostata: Lightly brush the top of the crostata dough with remaining beaten egg and sprinkle with turbinado sugar, if desired. Bake on the middle rack of the oven — about 35 minutes, or until the top turns lightly golden brown. It normally takes about 40-45 minutes for me to get the desired color on the crust. Remove from the oven and slide crostata with the parchment paper onto a wire rack. Or if you’ve used a cast iron skillet like me to bake your crostata, just leave it in the skillet to cool. Cool for 1 hour. Serve warm or at room temperature.

Tip: Make real whipped cream. Serve the warm crostata with the best vanilla ice cream you can buy and a dollop of fresh cream. You will think you’ve died and gone to heaven. I don’t have a huge sweet tooth. I maybe indulge in desserts a few times a year. Crostatas are always something I can’t resist when I make it. It’s just that good.

Einkorn Experiment

Or E2, however one gets the squared symbol to show up after the the E, or the double E. Call it what you’d like. Whatever this rose is named, I’m gonna be taking a little foray into cutting out modern wheat and replacing it with Einkorn. All this should be vastly interring as I try to make homemade bread and pasta and tortillas from Einkorn flour. Primitive flour has some different properties, namely sticky ones, and should turn my kitchen into a hot mess. Just the way I like it.

I have some health issues that need to be addressed. One of the ways in which I am doing so is taking a few supplements. Another way is changing the way I eat. I’ve decided to switch from mostly meats to fish and seafood. And to cut all modern wheat from my diet, instead using Einkorn for all my flour-y needs. I’m hoping these changes have a positive impact on my health and my life.

As part of the diet, my next few recipe shares will showcase some of my eating choices. Tomorrow, I’m getting a huge box of Alaskan seafood from New Sagaya in Anchorage. King crab legs, salmon, halibut, reindeer sausage all in one jumbo box of goodness. I’ll probably just eat the king crab legs steamed with butter and lemon. The salmon will be barbecued in herbs and sauce. But the rest, well, some of it will be chunked to put into a cioppino. To sop it all up, I’ll be making a homemade, rustic Einkorn bread.

Cioppino

3 tablespoons olive oil
1 large fennel bulb, thinly sliced
1 onion, chopped
3 large shallots, chopped
2 teaspoons salt
4 large garlic cloves, finely chopped
3/4 teaspoon dried crushed red pepper flakes, plus more to taste
1/4 cup tomato paste
1 (28-ounce) can diced tomatoes in juice
1 1/2 cups dry white wine
5 cups fish/seafood stock
1 bay leaf
2 corn cobs, cut in small pieces
1/2 pound sausage, half-mooned (I use reindeer)
1 pound manila clams, scrubbed
1 pound mussels, scrubbed, debearded
1 pound uncooked large shrimp, peeled and deveined
4-6 large scallops
Some crab, either pieces of king crab or smaller crabs halved
1 1/2 pounds assorted halibut and/or salmon filets, cut into 2-inch chunks

Directions

Heat the oil in a very large pot over medium heat. Add the fennel, onion, shallots, and salt and saute until the onion is translucent, about 10 minutes. Add the garlic and 3/4 teaspoon of red pepper flakes, and saute 2 minutes. Stir in the tomato paste. Add tomatoes with their juices, wine, fish stock and bay leaf. Cover and bring to a simmer. Add corn and sausage. Reduce the heat to medium-low. Cover and simmer until the flavors blend, about 30 minutes.

Add the clams and mussels to the cooking liquid. Cover and cook until the clams and mussels begin to open, about 5 minutes. Add the shrimp, crab, scallops and fish. Simmer gently until the fish and shrimp are just cooked through, and the clams are completely open, stirring gently, about 5 minutes longer (discard any clams and mussels that do not open). Season the soup, to taste, with more salt and red pepper flakes.

Ladle the soup into bowls and serve.

Slow Rise Rustic Einkorn Bread

5 cups (600g) of jovial einkorn flour
3 cups (600g) of jovial wheat berries
1¾ cup (410g) of warm water
¼ tsp. (1g) dry active yeast
1 tsp. (6g) sea salt

Directions

Mix flour, salt and yeast together in a large mixing bowl.

Add water and combine with your hands until all ingredients are mixed well. Your hands will be a sticky mess at this point, but that is normal with einkorn.

With a spatula, push down the sides of the dough and flatten the top.

Cover the bowl with plastic wrap and let rise in a dark place for 12-14 hours. Here is what the doughs should look like when ready to bake. Depending on the weather, the time it takes to proof the dough may vary.

Remember, einkorn flour contains carotenoids that can oxidize if exposed to water and light for a long period of time. Just like a carrot peel can darken, einkorn dough will when exposed to light. Therefore, either store the bowl in a dark space or use a ceramic bowl and put a plate on top to protect the dough from light.

When the dough is ready, place a ceramic or cast iron pot that is oven-safe and has a lid in the oven and heat for 30 minutes to the maximum temperature setting, or at least 500°F then lower the temperature to 450°F.

Turn out the dough on a heavily floured work surface. Pat the dough flat, and using a dough scraper or your hands, fold each of the four sides toward the center, using added flour to make a rounded shape. This is not like forming a typical loaf since the dough is quite soft. Don’t worry yourself too much about the shape because the dough will have a quick rise in the oven and will correct itself, leaving you with a beautifully rustic bread.

The rounded dough can be proofed for one more hour before baking, but we found in our testing it did not make a difference in the finished loaf. Therefore, we turned the dough right into the pot and baked covered for 40 minutes. We also baked the loaf for 30 minutes covered and 10 uncovered, but in the end, found the best results at 40 minutes with a cover for the entire baking time.

If you like a dark crust, return the loaf to the oven for 5-10 minutes more uncovered.

Lift the loaf out of the dish and place on a cooling rack.

You may also try this cooking method on a firmer dough.

Let cool for at least one hour before slicing.

A Tale of Two Pies

It’s summer. So it’s hot. And it might not seem like the time to bake, getting your kitchen all steamy and what not. But with all the delicious fruit available at farmer’s markets and grocery stores, well, pies are really the answer to a mid-summer dilemma.

Pies have always had an old-fashioned connotation. A cook’s staple. There’s a reason they’ve been around so long. They’re fucking yummy. Add ice cream and viola… sweet warm fruit pares with frozen cream to make something fab, y’all.

One of my fondest memories is of my Aunt Jessie’s rhubarb pie. The tartness combined with fresh from the cow that morning cream adding just that right touch of sweetness t make the tart stand out. I’ve tried to recreate that pie. To no avail. They either come out too sweet or not sweet enough. So I moved on and discovered strawberries in my rhubarb go together just fine. Those pies never seem to come out too sweet or not sweet enough. They one out just right.

The tale of the second pie stems from how great the strawberry rhubarb version came out. I liked the tartness of one thing melding together with the sweetness of another. So I looked. And looked. High and low, I looked. Nothing seemed to catch my fancy. Until I stumbled onto a recipe for peach raspberry pie. Holy Smokes, Batman. That combo sounded fab-u-lous. Raspberry with their tart and tangy taste. And peaches. Oh my goodness. I used to live in Georgia. Back in the day. Way back, yo. If you’ve EVER lived in or near Georgia in the summer, peaches became your best friend. I love them. Off the vine, cut up, in Bellinis, in cobblers and in pies. So I made magic in the kitchen.

So ends my tale of two pies.

Strawberry Rhubarb Pie

1¼ cups plus 2 tsp. sugar

By: Brandy

⅓ cup all-purpose flour
¼ tsp. ground nutmeg
¼ tsp. ground cinnamon
2 cups thinly sliced rhubarb
3 cups halved and hulled strawberries
2 tbsp. butter, cut into small pieces
2 tsp. milk

INSTRUCTIONS:
1. Preheat oven to 400°.  Mix together 1¼ cups of the sugar, flour, nutmeg, and cinnamon in a large mixing bowl, then add rhubarb and strawberries, tossing well to coat evenly.

2. Fill bottom crust with rhubarb–strawberry mixture and scatter butter on top. Cover with remaining pastry round (discarding wax paper) and crimp edges together to seal. Score top to allow steam to escape, brush with milk, and sprinkle with remaining 2 tsp. sugar. Place pie on a baking sheet and bake until crust is golden and filling is bubbling, about 50 minutes. If edge of crust browns too quickly, cover edge with a strip of aluminum foil to prevent burning. Allow pie to cool for 1 hour before serving.


Peach Raspberry Pie

⅔ cup sugar, plus more for sprinkling

By: Laura

⅓ cup flour
¼ cup packed light brown sugar
2 tbsp. fresh lemon juice
1 tbsp. peach schnapps
2 tsp. vanilla extract
1 tsp. cinnamon
½ tsp. ground ginger
½ tsp. kosher salt
¼ tsp. freshly grated nutmeg
6 large peaches (about 1 ¾ lb.), peeled and cut into ½″-thick slices
1 cup mashed fresh raspberries
4 tbsp. unsalted butter, cubed

INSTRUCTIONS
1. Preheat oven to 425°. In a large bowl, toss together sugar, flour, brown sugar, juice, schnapps, vanilla, cinnamon, ginger, salt, nutmeg, and peaches; set aside.

2. Roll one dough disk into a 12″ circle; fit into a 9″ pie plate. Pour half the filling into pie shell and cover with raspberries. Pour in remaining peach filling, and then dot filling with butter. Roll the remaining dough disk into a 12″ circle, place over filling, and trim dough, leaving a ½″ overhang. Lift edges and fold under to form a thick rim around the pie. Cut 4 slits in top of pie crust, brush with milk or melted butter, and sprinkle with more sugar. Bake until golden brown and filling is bubbling in the center, about 45 minutes. Let cool for about 20 minutes before serving.

Chicken Madeira

Coming off Memorial Day weekend, the last thing–the VERY LAST THING–I need is more calorie laden food. Umm, not. But a small part of me was craving, y’all. I got to cravin’ Cheesecake Factory’s Chicken Madeira. So I set about to getting the recipe. And there are lots of them, both for Cheesecake Factory’s version as well as for the sauce itself. Here is my not so off-the-cuff rendition of this fav.

Chicken Madeira

Ingredients:

4-6 pieces of chicken, pounded thin (I use a mix of breasts and thighs)
3 pieces of garlic, minced
1-2 medium onions, diced
2-3 cups of mushrooms, sliced
2-3 tbsps butter
3 cups madeira wine
1 cup beef broth ( I use a cup of water and Knorr’s beef jelly thing-a-ma-bobs)
2-3 tbsp flour
mozzarella slices
1 tsp thyme
salt
pepper

Instructions:

1. Preheat oven to 350. Heat skillet over medium-high heat. Season chicken with salt and pepper. Fry each piece in oil until golden brown on both sides. Place in oven casserole dish as they finish cooking.

2. Add more oil to the skillet. Add onions and cook for a few minutes. Add garlic and cook for another minute or two. Add mushrooms and cook for a few minutes.  Add flour and cook until it pastes. Add thyme and salt and pepper. Cook for a minute. Add wine and broth and cook until thick and reduced in half.

3. Place mozzarella slices on each piece of chicken. When sauce if thick and reduced in half, pour over chicken. Bake until cheese bubbles, or longer.

The Cheesecake Factory serves their chicken with asparagus and a heaping mound of mashed potatoes. I can attest that this is an excellent accompaniment choice for this dish. However, I like mine over an argula salad instead of asparagus, although I do really, really like the mashed potatoes to sop up the delicious madeira gravy. For those of you doing the low carb thing, roasted vegetables would be cool instead of the mashed potatoes as would roasted and riced cauliflower. For the Argula salad, I make a lemon/white wine vinaigrette right before I toss the greens and serve it under the chicken to help the argula wilt slightly.

Vinaigrette

1 tbsp dijon mustard
2-3 tbsp lemon juice
1-2 tbsp white wine vinegar
1/2 cup olive oil salt pepper parmesan cheese
– put mustard, juice and wine in a bowl. Whisk together. Keep whisking while adding olive oil. Add salt and pepper to taste being sure to under season for salt since the parmesan cheese is salty.  Stir in parmesan cheese. Toss in argula.

I fell in love with “rocket” as argula is called on the continent many moons ago. It is served quite often in many European countries. Plus, it just taste like summer. In any event, slice up some limes and pop open a Corona and eat the chicken. It is delish. Add in some rocket, and this flavor combo is out of this world. 😉

Risi e Bisi

Peas and Rice. Simple. Perfect. I learned about this dish when I went to Venice one summer. It was the summer that I got a wild hair up my ass and decided to leave everything behind for a month and kick around Europe. Granted, I should’ve done this as a young woman and not the… ahem… older woman I was when I went. I had a blast anyway.

It was the first vacation I’d ever taken alone. It was also the longest vacation I’d ever taken. And I included a 9 day hut-to-hut hiking trip through the Swiss Alps. I spent the next twenty days tooling around the Italian countryside by train. I got comfortable in my own skin on that trip. Alone. By myself in a foreign country or two. I met up with some girlfriends in Rome, but other than that… it was all me all the time.

I scheduled a couple of things before I left on my trip. One of those was a cooking class in Venice. And in that cooking class, I learned to make risi e bisi old school from a gracious native hostess. I’ve never forgotten her or the dish.

The recipe uses a combination of broth and wine. Many use just broth. The ones who view risi e bisi as the food to prepare as a herald of spring will find fresh peas and use the water from the cooking peas as the broth to make risi e bisi. I am not so exuberant in my greeting of Spring. 😉

Risi e Bisi

14-ounce bag frozen peas (a full pound is fine, too)
4 tablespoons butter
2 tablespoons onion, chopped
4 cups chicken stock, or 2 cups stock/2 cups white wine, or 4 cups pea broth
1 cup Arborio rice
1/2 cup Parmesan, freshly grated

In a soup pot or dutch oven, melt the butter over medium heat. Add the onion and sauté until it becomes lightly golden. In a separate pot, heat the stock until it reaches a simmer.

Easy Method:

Once the onion is ready, add 3 cups of the simmering stock, the rice, the bag of frozen peas, and a good pinch of salt. Cover the pot and and cook at a low boil for about 20 minutes, stirring occasionally, until the rice is just tender. If the soup is too thick, thin it slightly with the remaining stock; it should be thick but not porridge. When the rice is ready, add the grated Parmesan and taste for salt. Serve.

More Difficult Method:

Once onions are translucent, add rice to pot. Cook for a few minutes until rice starts absorbing the oil. Add in half a cup of liquid and cook while stirring. Cook down until almost all liquid is absorbed, add another half up of liquid. Cook while stirring until most of the liquid has been absorbed. Continue until all liquid has been cooked. In the last half cup of liquid, add peas. Taste and adjust seasoning. Don’t over salt if adding grated Parm as the cheese will add salt naturally.

* you can add diced pancetta or bacon to the pot with the onions to give it a different flavor or you can add crispy bacon bits at the end along with crunchy fried onions as a garnish. But this is a simple dish created to showcase new Spring peas.